Mirage: Difference between revisions
No edit summary |
|||
| (14 intermediate revisions by the same user not shown) | |||
| Line 3: | Line 3: | ||
== What is an impostor == | == What is an impostor == | ||
An impostor or imposter is a dynamically rendered billboard texture map used to | An impostor or imposter is a dynamically rendered billboard texture map used to give an illusion of 3D geometry in the distance. | ||
In Mirage context, you can have as many objects as you want in a single impostor, and all the the points of view are stored into an abedo | In the Mirage context, you can have as many objects as you want in a single impostor, and all the the points of view are stored into an abedo, normal and metallic maps. Smoothness or occlusion are not baked into textures yet but are still customizable on post baking options. | ||
== How to | == How to bake your first impostor == | ||
<code>Mirage</code> consists in a single editor window. You can open it via <code>Window->Mirage->Impostors</code>. For a simple one-click impostor approach, drag and drop the common ancestor of all the objects you want to bake into target area and click on the <code>Generate Impostor</code> button. | |||
You can also customize a lot of settings for a more advanced usage. There are 5 category foldouts that can expanded or hidden by clicking on their title. Even when hidden, they still provide basic information or controls on the right of the title. | |||
The following sections will provide detailed explaination of each category.[[File:Image 2024-02-06 164734156.png|center|thumb]] | |||
=== | === Setup the target(s) === | ||
This category holds all the source object(s) information. Note that only one impostor can be baked at a time, so all the target will all be part of the same impostor. | |||
For a simple approach, drag and drop the common ancestor in the dedicated field. Note that if you want to bake only one object the common ancestor can be the object itself or its parent. When the common ancestor is set, Mirage will automatically detect all the mesh filters in its children, recursively. You can check which mesh filters are included by expanding the section as following. Null or invalid objects will be ignored. | |||
[[File:Image 2024-02-06 170842562.png|center|thumb|357x357px]] | |||
You can also exclude some meshes or add some manually by dropping them into the area. If you change the mesh filters manually, the common ancestor will be updated accordingly. Note that '''a common ancestor is needed to bake an impostor'''. | |||
* The '' | === Quality Settings === | ||
* The | This category is crucial and will have a direct impact on the visual quality of the impostor as it provides full control over the baking topology. This section should be paired with the <code>Information</code> category that provides real-time visualization for an excellent and fast control over the baking topology. | ||
* | [[File:Image 2024-02-06 172158522.png|center|thumb|483x483px]] | ||
==== Texture Size ==== | |||
As previously mentionned, Color, Normal and Metallic Maps are stored into square POT atlases. This field controls the resolution of these atlases, from 128x128 to 4096x4096. The <code>Estimated total size</code> label provides the size of the whole impostor prefab after baking (with DXT compression) | |||
==== Sphere Type ==== | |||
*'''UV sphere''': The default choice. The UV sphere is based on a fixed number of longitude and latitude samples. The coverage is denser at the poles.The UV Sphere is a solid choice in many use cases, with more versatility regarding partial sphere baking. | |||
*'''Pseudo-Fibonacci sphere''': at an experimental stage. Provides a homogeneous coverage. Not compatible with latitude interpolation in the impostor shader. Despite being homogeneous, the output impostor will look smooth near the equator, with more noticeable snaps or blur around the poles. Full sphere baking only. | |||
==== Longitude Samples ==== | |||
UV Sphere only. Holds the number of longitudinal samples. The higher the better for smooth horizontal rotation, at a cost of higher POV number thus lower resolution/POV in the atlas. All samples are equally spread around the 360 degrees. | |||
==== Latitude Samples ==== | |||
UV Sphere only. Holds half of the number of latitudinal samples (equator excluded). This means that a 0 value will just bake around the equator. 1 will bake an additionnal sample on each side of the equator, and so on. | |||
The higher the better for smooth vertical rotation, at a cost of higher POV number thus lower resolution/POV in the atlas. | |||
==== Latitude Offset ==== | |||
UV Sphere only. Shifts the equator sample. Useful for partial spheres. | |||
==== Latitude Step ==== | |||
UV Sphere only. Holds angular offset between two latitudinal samples. A small value will increase smoothness of vertical rotation, but may limit the global latitudinal range. | |||
==== Density ==== | |||
Pseudo-Fibonacci sphere only. Controls the density of the sphere. The higher the better for smooth rotations in any direction, at a cost of higher POV number thus lower resolution/POV in the atlas. | |||
==== Lighting Method ==== | |||
# '''Surface Estimation:''' Computes dedicated normal and metallic map atlases to get physically correct light reflections on the impostor. The recommended method. The baked impostor will use a lit surface shader. | |||
# '''Use Scene Sun Source:''' Adds the sun source of the opened scene in the baking context. Can provide better results on single lit scenes, especially with intricate smoothness/occlusion materials. Uses significantly less memory per impostor. The baked impostor will use an unlit shader. | |||
==== Presets ==== | |||
You can add/load presets easily with the dedicated buttons. Gives an additional degree of freedom to match your workflow. A few relevant presets are already included such as 1-POV-billboard or different hemispheres. Importing a preset and modifying values won't modify the preset unless you explicitly export and replace it. | |||
=== Information === | |||
The whole information foldout is readonly. It provides useful visual feedback to help tweaking the previous category fields. | |||
[[File:Image 2024-02-06 180549368.png|center|thumb|426x426px]] | |||
On the left column, some metrics are displayed. The values will appear in green is considered valid, orange when considered too low/high. Please note that these colors are purely informative and won't inhibit the impostor generation. | |||
* The total number of POV. | |||
** For UV Sphere Baking : <big><math display="inline">N_{POV} = S_{Long}*S_{Lat}</math></big> | |||
** For Pseudo-Fibonacci Sphere baking : <big><math display="inline">N_{POV} = \sum_{l=-S_{Lat}/2}^{S_{Lat}/2}cos(\frac{2\pi.l}{S_{Lat}}).S_{Long} </math></big> | |||
* The Atlas POV size. 15x15 means there are 15 POVs per line and per column. | |||
* Single POV resolution | |||
* The atlas coverage : if <math>\sqrt{N_{POV}}</math> is an integer, the coverage will be 100% otherwise there will be blank slots in the atlas. 100% is better but not necessary. | |||
* Unused memory : The estimated memory held by the blank slots in the grid. Will be 0 if the coverage is 100% | |||
On the right area stand 3 tabs for more visual information. | |||
* POVs : Visualize the Longitude / Latitude coverage. A great helper when tweaking the Quality Settings. You can orbit around with the mouse to see clearer. | |||
* Layout : Visualize the Atlas layout. Filled atlas slots will be green, blank will be red. | |||
* Preview : Visualize how pixelated your each single POV will be. Displays the actual objects entered in the Target foldout. You can orbit around with the mouse as well. <!-- Please note the snappiness/bluriness won't be previewed here. The area only shows your inputs layout in the impostor and the pixelization but does not stand for a contractual appearance of the ouput impostor. --> | |||
=== LODGroup Settings === | |||
This category is not crucial since you can always modify it afterwards, but it can make you save a lot a time. If you just want to bake the impostor to a prefab without adding it to the scene, you can untick the field Automatic Setup. | |||
[[File:Image 2024-02-06 183403606.png|center|thumb|394x394px]] | |||
There are 4 possible scenarios for this area. | |||
* None of the input meshes are part of a LODGroup : A LODGroup will be added on the common ancestor. all the source renderers will be added in LOD0 and the impostor will be added in LOD1 following the given settings. A cross fading is added for smooth transitions. | |||
* There is already a LODGroup but no impostors : The impostor will be added in an additional LOD level following the given parameters. Note that all the source renderers MUST belong to either no LOD or the same LOD level from the same LODGroup to avoid nested LODGroup errors. | |||
* There is already a LODGroup with an impostor : The impostor will be replaced using the same relative height transition. Note that impostors are detected thanks to the ImpostorReference script attached to the LODGroup. If you want to have several impostors in the same LODGroup, just delete safely the ImpostorReference component before baking. Also, the previous impostor's prefab will not be deleted, only the instance in the scene will be replaced. | |||
* There isn't any common ancestor for the input objects. Baking won't be possible. | |||
== Save Path == | |||
Impostors are saved as packed prefabs, embedding the quad mesh, the atlas(es) and the material. You can customize this path in this section. | |||
[[File:Image 2024-02-06 184910768.png|center|thumb|401x401px]] | |||
You can either type the path relative to the Assets folder or use the file browser with the dedicated button. | |||
The label underneath the text field hold the actual, unique path that will be used for the impostor. | |||
If the path contains one or more non-existing directories, they will be created automatically at baking time. | |||
Note that no file nor directory is created before baking. | |||
== Post-baking adjustments == | |||
Both the Lit and Unlit impostor materials have a custom Shader GUI where you can perform advanced post-baking adjustments. | |||
[[File:Image 2024-02-06 190047781.png|center|thumb|865x865px]] | |||
=== Billboarding === | |||
The billboarding effect consists in making the quad face the camera at any time. This is performed in the vertex shader stage. | |||
* You can disable it with the dedicated toggle. | |||
* Clamp Latitude will stop the vertical billboard effect if the view angle gets out of the latitudinal range. The horizontal billboarding will remain. | |||
* Z Offset can get the a impostor closer from the camera. Really useful to get the most out of the LODGroup's crossfading effect, or to adapt the size at closer range without altering longer ranges. | |||
* The | === Surface === | ||
Due to the lack of smoothness, metallic and occlusion maps, it is sometimes required to tweak some surface parameters to match the source objects better. | |||
* The Brightness slider can increase/decrease the albedo power. | |||
* The Saturation slider can increase/decrease the color saturation. | |||
* The Smoothness and Occlusion sliders work the same way than the default diffuse material. | |||
* The Metallic slider is multiplied with the computed metallic map. | |||
* The Curvature Occlusion slider applies an additionnal occlusion in rifts, and sharp angles, to estimate self-shades. Can create a gray outline on some objects. | |||
=== | === Contours === | ||
Impostors use opaque materials. To get the contours right we use alpha clipping to discard pixels that are not representing the object on each POV. The contours are usually fine out-of-the-box, but sometimes it is required to adjust a few settings. | |||
* The Cutout slider can increase/decrease the sharpness of the alpha clipping geometry. You should not go higher than 0.5 to avoid cropping some important features. | |||
* The Interpolate toggle turns On/Off impostor bilinear interpolation smoothing. Interpolation removes the snapping effect, but adds blur. Note that interpolation adds shader complexity. | |||
From | * The Dithering Fade toggle turns On/Off Dithering fading on the edges of the impostor. Independant from the LODGroup crossfade effect. | ||
[[File:2024-02-14-23-15-13.gif|center|From left to right: The original model, interpolation disabled, interpolation enabled.|frame]] | |||
=== Geometry === | |||
These settings are theoritically not needed but give additionnal freedom to advanced users. | |||
* The Yaw/Elevation offset sliders make the object virtually rotate on the Horizontal/Vertical axis respectively. | |||
=== Advanced Options === | |||
You can control the Render Queue, Double sided Global Illumation and GPU instancing, like the default surface shader. | |||
== | == Post-Baking Memory Optimization == | ||
Since version 1.2.0, Mirage embeds an Impostor Optimizer (<code>Window->Mirage->Impostor Optimizer</code>) to change the textures atlases formats and downsample Albedo, Normal and Mask atlases independantly. This is especially useful to build on iOS as DXT compression is not supported on this platform, or to reduce the final build size. | |||
[[File:Image 2024-08-30 171822247.png|center|thumb]] | |||
Please be aware that these optimizations change the prefabs directly thus are NOT REVERSIBLE, it is advised to fine-tune on impostors copies first. | |||
You can have as many impostors as you want in the drop zone, the same settings will be applied to all of them sequentially. | |||
== | == Compatible objects == | ||
Mirage Impostors are compatible with any object with a MeshFilter and a MeshRenderer attached. | |||
Note that translations (on all axes), scaling (on all axes) and rotation (around the vertical axis only) are supported. | |||
==== | == Limitations == | ||
Due to their nature, Mirage's impostors have their few limitations. | |||
* | * Full rotation compatibility : as said just above, the impostors won't be rotated around X and Z axes even if their parent does. | ||
* | * Lossy scale : Mirage uses the transforms [https://docs.unity3d.com/ScriptReference/Transform-lossyScale.html lossyScale] of the source objects. If the source objects are skewed by nested non uniform scaling a rotation, the impostor may be a appear close from but source but unskewed. | ||
* Shadows : Mirage impostors are compatible with shadows but they are not physically correct since it only projects the alpha clipped quad instead of having a dedicated shadow pass. It means shadow will be correct if the light comes from the front or the back but not the sides of the impostor. This is a simplicity choice, since correct shadow would add a GPU-intensive shader pass and shadows are usually not even visible from the impostor nominal distance. Moreover, it keeps Mirage natively pipeline independant since shader graph is not yet designed to add custom passes. | |||
== Contact == | == Contact == | ||
[mailto: | Didn't find what you were searching for? | ||
Feel free to contact me by email or on my discord channel. | |||
[mailto:support@leochaumartin.com support@leochaumartin.com] | |||
https://discord.gg/kYwzdvAt8q | |||
== References == | == References == | ||
Latest revision as of 18:22, 30 August 2024
Setup
The whole package is contained in the Mirage folder resulting from the import but you can move it wherever you want.
What is an impostor
An impostor or imposter is a dynamically rendered billboard texture map used to give an illusion of 3D geometry in the distance.
In the Mirage context, you can have as many objects as you want in a single impostor, and all the the points of view are stored into an abedo, normal and metallic maps. Smoothness or occlusion are not baked into textures yet but are still customizable on post baking options.
How to bake your first impostor
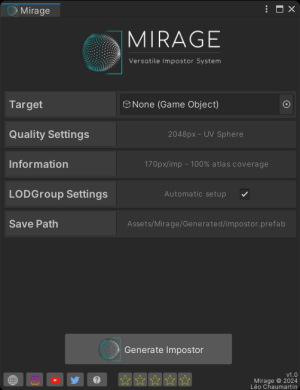
Mirage consists in a single editor window. You can open it via Window->Mirage->Impostors. For a simple one-click impostor approach, drag and drop the common ancestor of all the objects you want to bake into target area and click on the Generate Impostor button.
You can also customize a lot of settings for a more advanced usage. There are 5 category foldouts that can expanded or hidden by clicking on their title. Even when hidden, they still provide basic information or controls on the right of the title.
The following sections will provide detailed explaination of each category.
Setup the target(s)
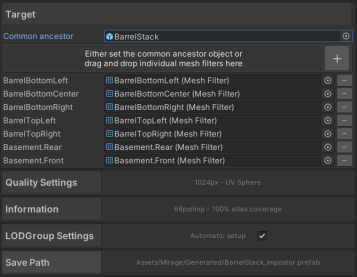
This category holds all the source object(s) information. Note that only one impostor can be baked at a time, so all the target will all be part of the same impostor. For a simple approach, drag and drop the common ancestor in the dedicated field. Note that if you want to bake only one object the common ancestor can be the object itself or its parent. When the common ancestor is set, Mirage will automatically detect all the mesh filters in its children, recursively. You can check which mesh filters are included by expanding the section as following. Null or invalid objects will be ignored.
You can also exclude some meshes or add some manually by dropping them into the area. If you change the mesh filters manually, the common ancestor will be updated accordingly. Note that a common ancestor is needed to bake an impostor.
Quality Settings
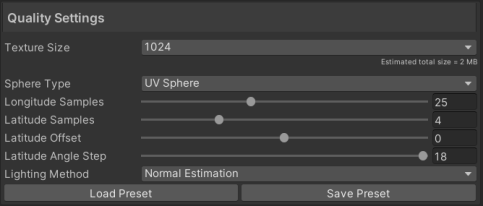
This category is crucial and will have a direct impact on the visual quality of the impostor as it provides full control over the baking topology. This section should be paired with the Information category that provides real-time visualization for an excellent and fast control over the baking topology.
Texture Size
As previously mentionned, Color, Normal and Metallic Maps are stored into square POT atlases. This field controls the resolution of these atlases, from 128x128 to 4096x4096. The Estimated total size label provides the size of the whole impostor prefab after baking (with DXT compression)
Sphere Type
- UV sphere: The default choice. The UV sphere is based on a fixed number of longitude and latitude samples. The coverage is denser at the poles.The UV Sphere is a solid choice in many use cases, with more versatility regarding partial sphere baking.
- Pseudo-Fibonacci sphere: at an experimental stage. Provides a homogeneous coverage. Not compatible with latitude interpolation in the impostor shader. Despite being homogeneous, the output impostor will look smooth near the equator, with more noticeable snaps or blur around the poles. Full sphere baking only.
Longitude Samples
UV Sphere only. Holds the number of longitudinal samples. The higher the better for smooth horizontal rotation, at a cost of higher POV number thus lower resolution/POV in the atlas. All samples are equally spread around the 360 degrees.
Latitude Samples
UV Sphere only. Holds half of the number of latitudinal samples (equator excluded). This means that a 0 value will just bake around the equator. 1 will bake an additionnal sample on each side of the equator, and so on.
The higher the better for smooth vertical rotation, at a cost of higher POV number thus lower resolution/POV in the atlas.
Latitude Offset
UV Sphere only. Shifts the equator sample. Useful for partial spheres.
Latitude Step
UV Sphere only. Holds angular offset between two latitudinal samples. A small value will increase smoothness of vertical rotation, but may limit the global latitudinal range.
Density
Pseudo-Fibonacci sphere only. Controls the density of the sphere. The higher the better for smooth rotations in any direction, at a cost of higher POV number thus lower resolution/POV in the atlas.
Lighting Method
- Surface Estimation: Computes dedicated normal and metallic map atlases to get physically correct light reflections on the impostor. The recommended method. The baked impostor will use a lit surface shader.
- Use Scene Sun Source: Adds the sun source of the opened scene in the baking context. Can provide better results on single lit scenes, especially with intricate smoothness/occlusion materials. Uses significantly less memory per impostor. The baked impostor will use an unlit shader.
Presets
You can add/load presets easily with the dedicated buttons. Gives an additional degree of freedom to match your workflow. A few relevant presets are already included such as 1-POV-billboard or different hemispheres. Importing a preset and modifying values won't modify the preset unless you explicitly export and replace it.
Information
The whole information foldout is readonly. It provides useful visual feedback to help tweaking the previous category fields.
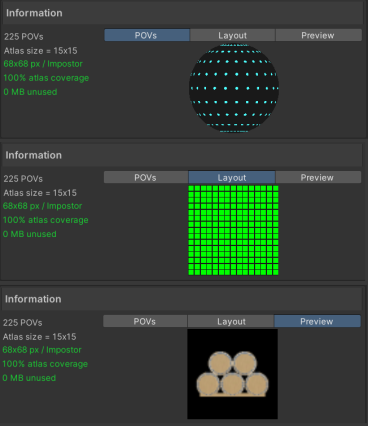
On the left column, some metrics are displayed. The values will appear in green is considered valid, orange when considered too low/high. Please note that these colors are purely informative and won't inhibit the impostor generation.
- The total number of POV.
- For UV Sphere Baking :
- For Pseudo-Fibonacci Sphere baking :
- The Atlas POV size. 15x15 means there are 15 POVs per line and per column.
- Single POV resolution
- The atlas coverage : if is an integer, the coverage will be 100% otherwise there will be blank slots in the atlas. 100% is better but not necessary.
- Unused memory : The estimated memory held by the blank slots in the grid. Will be 0 if the coverage is 100%
On the right area stand 3 tabs for more visual information.
- POVs : Visualize the Longitude / Latitude coverage. A great helper when tweaking the Quality Settings. You can orbit around with the mouse to see clearer.
- Layout : Visualize the Atlas layout. Filled atlas slots will be green, blank will be red.
- Preview : Visualize how pixelated your each single POV will be. Displays the actual objects entered in the Target foldout. You can orbit around with the mouse as well.
LODGroup Settings
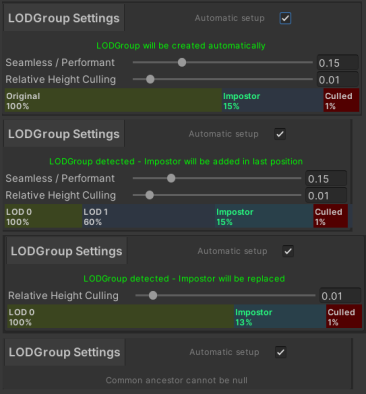
This category is not crucial since you can always modify it afterwards, but it can make you save a lot a time. If you just want to bake the impostor to a prefab without adding it to the scene, you can untick the field Automatic Setup.
There are 4 possible scenarios for this area.
- None of the input meshes are part of a LODGroup : A LODGroup will be added on the common ancestor. all the source renderers will be added in LOD0 and the impostor will be added in LOD1 following the given settings. A cross fading is added for smooth transitions.
- There is already a LODGroup but no impostors : The impostor will be added in an additional LOD level following the given parameters. Note that all the source renderers MUST belong to either no LOD or the same LOD level from the same LODGroup to avoid nested LODGroup errors.
- There is already a LODGroup with an impostor : The impostor will be replaced using the same relative height transition. Note that impostors are detected thanks to the ImpostorReference script attached to the LODGroup. If you want to have several impostors in the same LODGroup, just delete safely the ImpostorReference component before baking. Also, the previous impostor's prefab will not be deleted, only the instance in the scene will be replaced.
- There isn't any common ancestor for the input objects. Baking won't be possible.
Save Path
Impostors are saved as packed prefabs, embedding the quad mesh, the atlas(es) and the material. You can customize this path in this section.
You can either type the path relative to the Assets folder or use the file browser with the dedicated button.
The label underneath the text field hold the actual, unique path that will be used for the impostor.
If the path contains one or more non-existing directories, they will be created automatically at baking time.
Note that no file nor directory is created before baking.
Post-baking adjustments
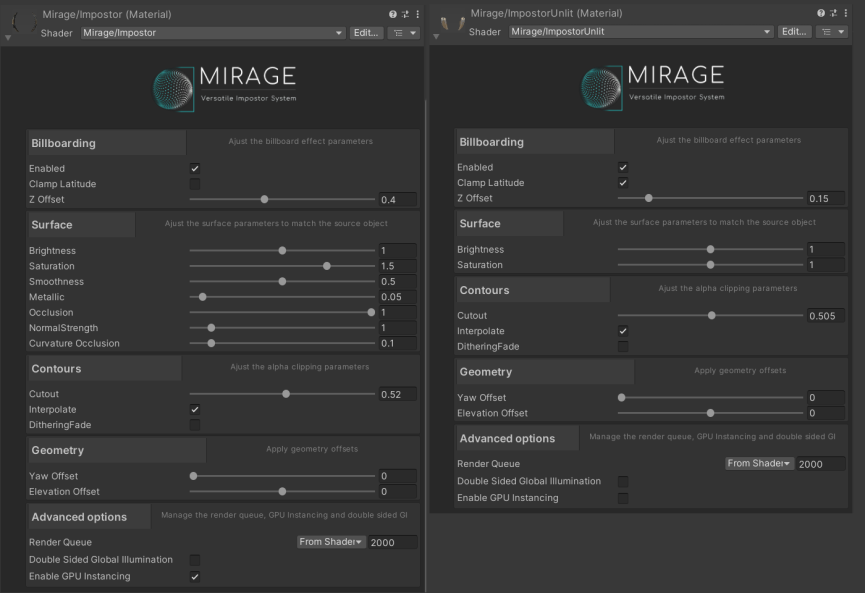
Both the Lit and Unlit impostor materials have a custom Shader GUI where you can perform advanced post-baking adjustments.
Billboarding
The billboarding effect consists in making the quad face the camera at any time. This is performed in the vertex shader stage.
- You can disable it with the dedicated toggle.
- Clamp Latitude will stop the vertical billboard effect if the view angle gets out of the latitudinal range. The horizontal billboarding will remain.
- Z Offset can get the a impostor closer from the camera. Really useful to get the most out of the LODGroup's crossfading effect, or to adapt the size at closer range without altering longer ranges.
Surface
Due to the lack of smoothness, metallic and occlusion maps, it is sometimes required to tweak some surface parameters to match the source objects better.
- The Brightness slider can increase/decrease the albedo power.
- The Saturation slider can increase/decrease the color saturation.
- The Smoothness and Occlusion sliders work the same way than the default diffuse material.
- The Metallic slider is multiplied with the computed metallic map.
- The Curvature Occlusion slider applies an additionnal occlusion in rifts, and sharp angles, to estimate self-shades. Can create a gray outline on some objects.
Contours
Impostors use opaque materials. To get the contours right we use alpha clipping to discard pixels that are not representing the object on each POV. The contours are usually fine out-of-the-box, but sometimes it is required to adjust a few settings.
- The Cutout slider can increase/decrease the sharpness of the alpha clipping geometry. You should not go higher than 0.5 to avoid cropping some important features.
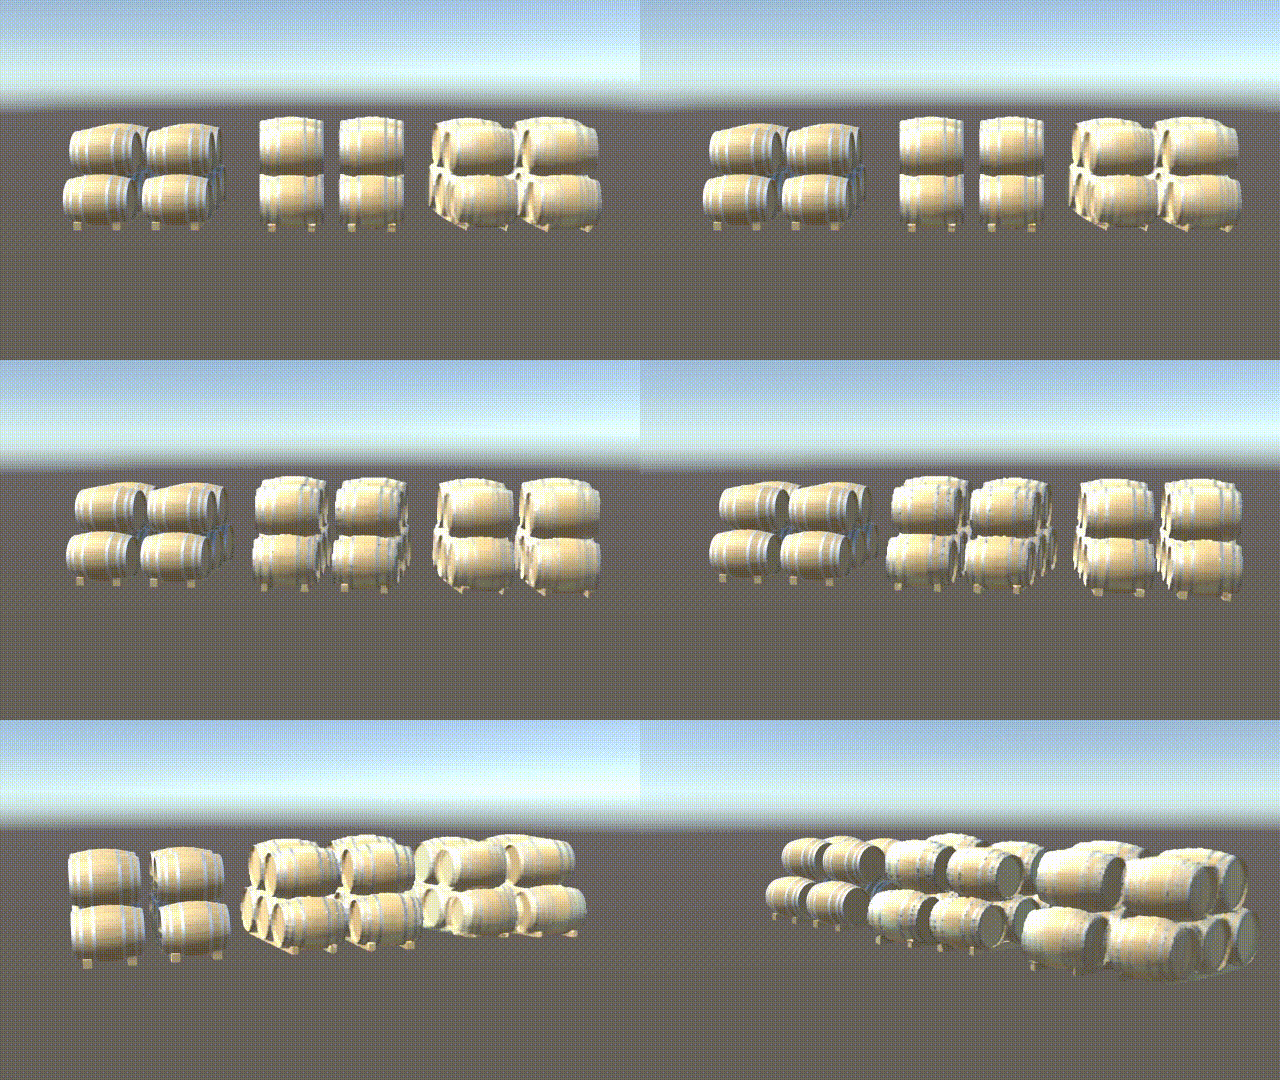
- The Interpolate toggle turns On/Off impostor bilinear interpolation smoothing. Interpolation removes the snapping effect, but adds blur. Note that interpolation adds shader complexity.
- The Dithering Fade toggle turns On/Off Dithering fading on the edges of the impostor. Independant from the LODGroup crossfade effect.
Geometry
These settings are theoritically not needed but give additionnal freedom to advanced users.
- The Yaw/Elevation offset sliders make the object virtually rotate on the Horizontal/Vertical axis respectively.
Advanced Options
You can control the Render Queue, Double sided Global Illumation and GPU instancing, like the default surface shader.
Post-Baking Memory Optimization
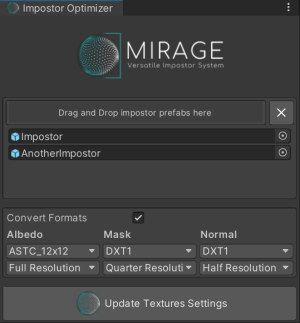
Since version 1.2.0, Mirage embeds an Impostor Optimizer (Window->Mirage->Impostor Optimizer) to change the textures atlases formats and downsample Albedo, Normal and Mask atlases independantly. This is especially useful to build on iOS as DXT compression is not supported on this platform, or to reduce the final build size.
Please be aware that these optimizations change the prefabs directly thus are NOT REVERSIBLE, it is advised to fine-tune on impostors copies first.
You can have as many impostors as you want in the drop zone, the same settings will be applied to all of them sequentially.
Compatible objects
Mirage Impostors are compatible with any object with a MeshFilter and a MeshRenderer attached.
Note that translations (on all axes), scaling (on all axes) and rotation (around the vertical axis only) are supported.
Limitations
Due to their nature, Mirage's impostors have their few limitations.
- Full rotation compatibility : as said just above, the impostors won't be rotated around X and Z axes even if their parent does.
- Lossy scale : Mirage uses the transforms lossyScale of the source objects. If the source objects are skewed by nested non uniform scaling a rotation, the impostor may be a appear close from but source but unskewed.
- Shadows : Mirage impostors are compatible with shadows but they are not physically correct since it only projects the alpha clipped quad instead of having a dedicated shadow pass. It means shadow will be correct if the light comes from the front or the back but not the sides of the impostor. This is a simplicity choice, since correct shadow would add a GPU-intensive shader pass and shadows are usually not even visible from the impostor nominal distance. Moreover, it keeps Mirage natively pipeline independant since shader graph is not yet designed to add custom passes.
Contact
Didn't find what you were searching for?
Feel free to contact me by email or on my discord channel.
References
https://calcifer.org/kenneth-christiansen/ComputerScience/imposters.pdf
https://developer.nvidia.com/gpugems/gpugems3/part-iv-image-effects/chapter-21-true-impostors
