Sampl: Difference between revisions
(Created page with "Seamless is a powerful graph builder integrated in the Unity Editor. It allows you to bake beautiful procedural textures from noise or geometric primitives, coupled with mathematical operations, image filters, etc. Seamless works natively with any render pipeline on any Unity version above 2018.1. thumb|366x366px|The Seamless logo. Fun-fact: it was created with the tool itself == Setup == The whole package is contained in the Seamless folde...") |
|||
| (6 intermediate revisions by the same user not shown) | |||
| Line 1: | Line 1: | ||
Sampl is a powerful audio graph builder integrated in the Unity Editor. It allows | |||
you to bake | you to bake unique procedural audio clips from noise, trigonometric or instrument primitives, | ||
coupled with mathematical operations, | coupled with mathematical operations, filters, etc. | ||
Sampl works natively with any render pipeline on any Unity version above | |||
2020.3 | |||
== Setup == | == Setup == | ||
The whole package is contained in the | The whole package is contained in the Sampl folder resulting from the import. You can move it wherever you want, but it is recommended to keep the same folder structure. | ||
== Basics == | == Basics == | ||
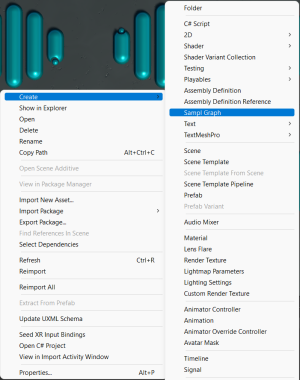
You can create a new | You can create a new Sampl graph from the right-click context menu in the project window. | ||
[[File:Sampl2.png|frameless]] | |||
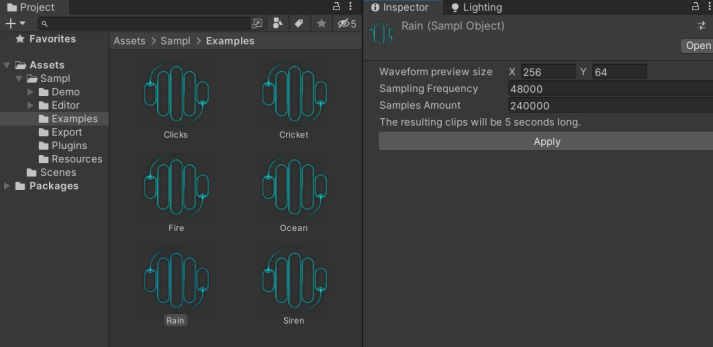
Each graph is saved as a | Each graph is saved as a SamplObject in a <code>.asset</code> file. You can recognize | ||
them with the | them with the Sampl logo. You can change some parameters from the inspector such as sampling frequency and the length of the clip. | ||
[[File: | [[File:Sampl1.png|frameless|713x713px]] | ||
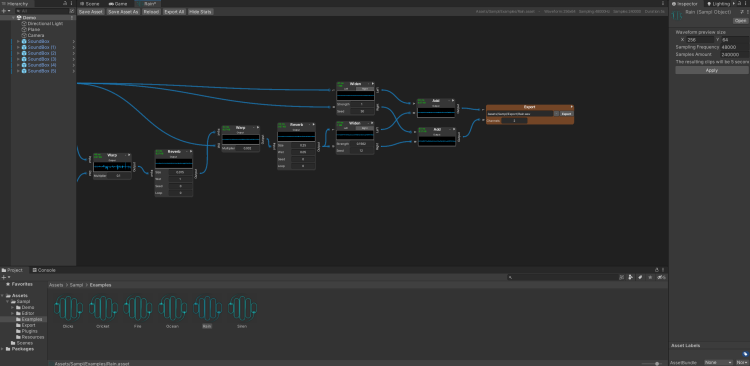
You can open a graph by double-clicking on it. | You can open a graph by double-clicking on it. The window will try to dock itself next to the scene window, otherwise it will appear as a floating window, that you can dock manually. | ||
[[File:Image 2023-04-27 181556615.png|center|thumb|750x750px|The provided procedural rain example]] | |||
== Navigation == | == Navigation == | ||
The navigation in the main canvas is similar to other graph editors such as Shadergraph or the animator. You can zoom in/out using scroll wheel, move by click & drag on the mouse scroll wheel. Nodes can be selected by clicking on it, | The navigation in the main canvas is similar to other graph editors such as Shadergraph or the animator. You can zoom in/out using scroll wheel, move by click & drag on the mouse scroll wheel. Nodes can be selected by clicking on it, by drawing a selection rectangle, or by using Ctrl + click. You can drag selected nodes to move them. | ||
You cannot select or interact with links: they are 100% visual. To add a link, you must click and drag from an output, links cannot be created backwards. To remove a link you must remove one of the nodes it connect, click the red cross on its left, or connect another link to the same output node. There is a header on the top of each window containing information and buttons to save, save as, reload the graph, export all the export nodes, or show/hide stats on each node. | |||
To create a new node, just right click on the canvas and a context menu will appear. You can also start building a link and releasing the mouse left button in a free space, the same context menu will appear and the link will be associated with the first input (if there is any) of the added node. You can cancel by pressing ESC. | |||
Some nodes contain one or several parameters. You can change their value as a text edit or as a slider with the mouse. | Some nodes contain one or several parameters. You can change their value as a text edit or as a slider with the mouse. | ||
Once you are happy with a | Once you are happy with a node's clip, you can export it as a static wav clip using an Export node. You can use as many Export nodes as you want. So far, Sampl only supports WAV export. | ||
You can browse the path by clicking on the Folder icon. Make sure you select a path included in the Assets folder of your project. | You can browse the path by clicking on the Folder icon. Make sure you select a path included in the Assets folder of your project. | ||
== Nodes list == | == Nodes list == | ||
[[File: | [[File:Image 2023-05-02 093231644.png|thumb|All of Sampl's primitives|none|756x756px]] | ||
=== Multiply === | |||
Multiplies two inputs. The Multiplier parameter can adjust the output gain. | |||
=== Multiply === | |||
Multiplies | |||
=== | === Add === | ||
Adds the two inputs | |||
=== | === Subtract === | ||
Subtracts the input A with input B | |||
=== | === Clamp === | ||
Clamps the input in the given range | |||
=== | === Invert === | ||
Inverts the phase | |||
=== | === ShiftScale === | ||
A multiple parameter node to control the pitch and a relative temporal offset | |||
=== | === Lerp === | ||
Linear interpolation between 2 clips A and B, following the T curve. T's [-1,1] interval is remapped according to the provided parameter. | |||
=== | === Warp === | ||
Temporal warping feature. For each sample in the output clip : <math>Output[i]= Input[i + Dist[i] * Multiplier];</math> | |||
=== | === Reverse === | ||
Time reverse. | |||
=== | === Remap === | ||
Linear remapping of the input [-1,1] into the given interval. | |||
=== | === Equalizer === | ||
Experimental. An FFT based GPU equalizer. Uses unity built-in curve widget. | |||
=== | === Reverb === | ||
Simulates reverb. Useful to "smooth" an aggressive sound | |||
=== | === Delay === | ||
Echoes with linear damping. You can control the number of feedbacks and their interval with the given parameters. | |||
=== | === Maximize === | ||
Amplifies samples that are above the intensity threshold given in the parameters. | |||
=== | === Envelope === | ||
Returns the intensity envelope of the input signal using the given window size. The ouput is always in the [0,1] interval. | |||
=== | === Resample === | ||
Simulates a downsampling to the given number of bits. | |||
=== | === Fade === | ||
In and Out fading. | |||
=== | === Widen === | ||
Experimental. Useful to get a proper stereo track from a mono one. | |||
=== | === Constant === | ||
Constant value in the interval [-1,1] | |||
=== | === Noise === | ||
White noise. | |||
=== | === SineWave === | ||
Pure sine wave. You can control the frequency, phase and the amplitude from the parameters. | |||
=== | === Sawtooth === | ||
Sawtooth wave. You can control the frequency, phase and the amplitude from the parameters. | |||
=== | === TriangleWave === | ||
Triangle wave. You can control the frequency, phase and the amplitude from the parameters. | |||
=== | === SquareWave === | ||
Square wave. You can control the frequency, phase and the amplitude from the parameters. | |||
=== | === SineRamp === | ||
Linear pure sine riser. You can control the frequencies, phase and the amplitude from the parameters. | |||
=== | === DynamicSine === | ||
Outputs a sine with a variable frequency, depending on the input and the remapping parameters provided. You can choose the sine type, phase, window size (the lower the better but also the longer to process), and amplitude from the parameters. | |||
=== | ===AudioClip=== | ||
Outputs the given AudioClip. An operation is performed to adapt the sample rate to the graph's one, but the samples are not stretched to fit the length of the clip, padding 0 are added instead (or the clip is clamped if it is longer). <!-- If assets are reimported, the AudioClip may be missing, just put it back in the object field. --> | |||
=== | === Kick === | ||
Experimental. Close from the pad sound but dissonant. | |||
== | === Pad === | ||
Experimental. A simple synth sound. | |||
=== Curve === | |||
Draw your own curve from unity curve input widget. | |||
=== Export === | |||
Export any clip you want. Mono and Stereo are supported. The provided path must be in the Assets folder from the current project. | |||
== Troubleshooting == | == Troubleshooting == | ||
=== The | === The graph is frozen, spams errors and no nodes are showing up === | ||
The Unity Editor can sometimes free up memory and delete some nodes audio clips. Try to change tab if it is docked, right click on the frozen sampl graph tab and select "close tab". Reopening the graph should solve the issue. | |||
==Contact== | ==Contact== | ||
Feel free to contact me via e-mail: [mailto: | Feel free to contact me via e-mail: [mailto:support@leochaumartin.com support@leochaumartin.com] | ||
Latest revision as of 00:13, 13 February 2024
Sampl is a powerful audio graph builder integrated in the Unity Editor. It allows
you to bake unique procedural audio clips from noise, trigonometric or instrument primitives,
coupled with mathematical operations, filters, etc.
Sampl works natively with any render pipeline on any Unity version above
2020.3
Setup
The whole package is contained in the Sampl folder resulting from the import. You can move it wherever you want, but it is recommended to keep the same folder structure.
Basics
You can create a new Sampl graph from the right-click context menu in the project window.
Each graph is saved as a SamplObject in a .asset file. You can recognize
them with the Sampl logo. You can change some parameters from the inspector such as sampling frequency and the length of the clip.
You can open a graph by double-clicking on it. The window will try to dock itself next to the scene window, otherwise it will appear as a floating window, that you can dock manually.
The navigation in the main canvas is similar to other graph editors such as Shadergraph or the animator. You can zoom in/out using scroll wheel, move by click & drag on the mouse scroll wheel. Nodes can be selected by clicking on it, by drawing a selection rectangle, or by using Ctrl + click. You can drag selected nodes to move them.
You cannot select or interact with links: they are 100% visual. To add a link, you must click and drag from an output, links cannot be created backwards. To remove a link you must remove one of the nodes it connect, click the red cross on its left, or connect another link to the same output node. There is a header on the top of each window containing information and buttons to save, save as, reload the graph, export all the export nodes, or show/hide stats on each node.
To create a new node, just right click on the canvas and a context menu will appear. You can also start building a link and releasing the mouse left button in a free space, the same context menu will appear and the link will be associated with the first input (if there is any) of the added node. You can cancel by pressing ESC.
Some nodes contain one or several parameters. You can change their value as a text edit or as a slider with the mouse.
Once you are happy with a node's clip, you can export it as a static wav clip using an Export node. You can use as many Export nodes as you want. So far, Sampl only supports WAV export.
You can browse the path by clicking on the Folder icon. Make sure you select a path included in the Assets folder of your project.
Nodes list
Multiply
Multiplies two inputs. The Multiplier parameter can adjust the output gain.
Add
Adds the two inputs
Subtract
Subtracts the input A with input B
Clamp
Clamps the input in the given range
Invert
Inverts the phase
ShiftScale
A multiple parameter node to control the pitch and a relative temporal offset
Lerp
Linear interpolation between 2 clips A and B, following the T curve. T's [-1,1] interval is remapped according to the provided parameter.
Warp
Temporal warping feature. For each sample in the output clip :
Reverse
Time reverse.
Remap
Linear remapping of the input [-1,1] into the given interval.
Equalizer
Experimental. An FFT based GPU equalizer. Uses unity built-in curve widget.
Reverb
Simulates reverb. Useful to "smooth" an aggressive sound
Delay
Echoes with linear damping. You can control the number of feedbacks and their interval with the given parameters.
Maximize
Amplifies samples that are above the intensity threshold given in the parameters.
Envelope
Returns the intensity envelope of the input signal using the given window size. The ouput is always in the [0,1] interval.
Resample
Simulates a downsampling to the given number of bits.
Fade
In and Out fading.
Widen
Experimental. Useful to get a proper stereo track from a mono one.
Constant
Constant value in the interval [-1,1]
Noise
White noise.
SineWave
Pure sine wave. You can control the frequency, phase and the amplitude from the parameters.
Sawtooth
Sawtooth wave. You can control the frequency, phase and the amplitude from the parameters.
TriangleWave
Triangle wave. You can control the frequency, phase and the amplitude from the parameters.
SquareWave
Square wave. You can control the frequency, phase and the amplitude from the parameters.
SineRamp
Linear pure sine riser. You can control the frequencies, phase and the amplitude from the parameters.
DynamicSine
Outputs a sine with a variable frequency, depending on the input and the remapping parameters provided. You can choose the sine type, phase, window size (the lower the better but also the longer to process), and amplitude from the parameters.
AudioClip
Outputs the given AudioClip. An operation is performed to adapt the sample rate to the graph's one, but the samples are not stretched to fit the length of the clip, padding 0 are added instead (or the clip is clamped if it is longer).
Kick
Experimental. Close from the pad sound but dissonant.
Pad
Experimental. A simple synth sound.
Curve
Draw your own curve from unity curve input widget.
Export
Export any clip you want. Mono and Stereo are supported. The provided path must be in the Assets folder from the current project.
Troubleshooting
The graph is frozen, spams errors and no nodes are showing up
The Unity Editor can sometimes free up memory and delete some nodes audio clips. Try to change tab if it is docked, right click on the frozen sampl graph tab and select "close tab". Reopening the graph should solve the issue.
Contact
Feel free to contact me via e-mail: support@leochaumartin.com


![{\displaystyle Output[i]=Input[i+Dist[i]*Multiplier];}](https://wikimedia.org/api/rest_v1/media/math/render/svg/f5d47003cc9b6764c202dcb1aec2d869b26be5d8)