AutoLOD: Difference between revisions
(init) |
No edit summary |
||
| Line 10: | Line 10: | ||
== How to use == | == How to use == | ||
AutoLOD consists in an editor window. You can open it via <code>Window->AutoLOD->MeshDecimator</code>. | AutoLOD consists in an editor window. You can open it via <code>Window->AutoLOD->MeshDecimator</code>. | ||
[[File:How to open the window.png|frameless]] | [[File:How to open the window.png|frameless]] | ||
Put the object(s) to be processed into the ”targets” area. Please note that a Renderer is required otherwise the object cannot be added. | Put the object(s) to be processed into the ”targets” area. Please note that a Renderer is required otherwise the object cannot be added. | ||
[[File:AutoLOD MAN2.png|frameless]] | [[File:AutoLOD MAN2.png|frameless]] | ||
By default, the same presets will be applied to every renderer in the list. | By default, the same presets will be applied to every renderer in the list. | ||
| Line 20: | Line 24: | ||
[[File:Autolod MAN3.png|frameless]] | [[File:Autolod MAN3.png|frameless]] | ||
Both settings panels are identical, meaning that each object is fully customizable independantly from others or from the common settings. | Both settings panels are identical, meaning that each object is fully customizable independantly from others or from the common settings. | ||
Revision as of 19:57, 13 June 2022
AutoLOD is a very simple tool that will generate a LOD group with any 3D
object from your scene. It will automatically compute simplified version of your
meshes using decimation.
Setup
The whole package is contained in the AutoLOD folder resulting from the import. You can move it wherever you want, but it is recommended to keep the same folder structure.
How to use
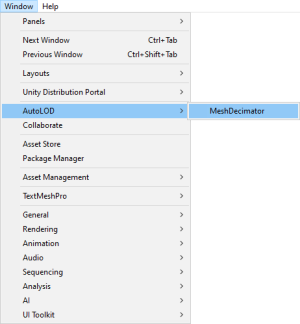
AutoLOD consists in an editor window. You can open it via Window->AutoLOD->MeshDecimator.
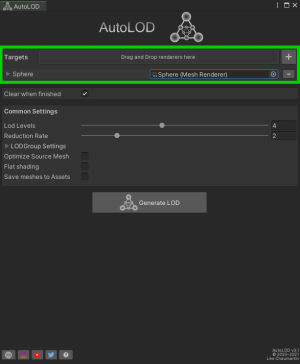
Put the object(s) to be processed into the ”targets” area. Please note that a Renderer is required otherwise the object cannot be added.
By default, the same presets will be applied to every renderer in the list.
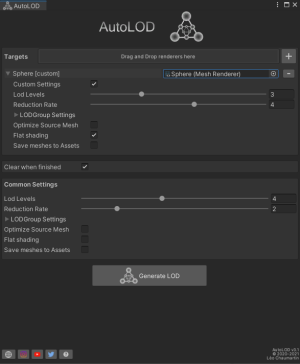
You can customize these presets in the Custom Settings section.
You can also customize per-object settings by folding out targets in the list.
Both settings panels are identical, meaning that each object is fully customizable independantly from others or from the common settings.
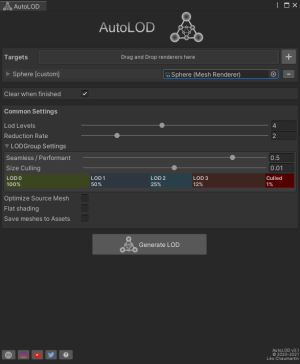
The LODGroup Settings foldout let you control the LODGroup setup as it should be when created, but you can still change it manually when the process is over. You cannot interact with the LODGroup widget (which is NOT the actual widget, but just a representation), only the sliders LOD Levels, Seamless/Performant and Size Culling will influence it.
You may want to save the decimated meshes to the assets. You just have to check the Save meshes to Assets toggle and enter a path. If the path does not exist, the program will automatically create it for you.
When you are ready, just click on the button Generate LOD
Features
- Minimalist interface and really easy to use
- Works in both edit and play mode
- Works on prefabs instances (no need to unpack them)
- Generated objects can manually be saved as prefabs as long as the toggle
Save meshes to Assetsis checked with a valid path. - Generates up to 8 LOD for a single object
- Decimates UVs (from uv1 to uv4) and bone weights too.
- Compatible with sub-meshes
- Creates colliders for simplified meshes (if the source has one)
- Can be used for simple distance culling too
- Fully compatible with any render pipeline
Some tips
- A demo scene is provided in the Scene folder: click play and follow the instructions. The provided material in the scene should appear pink in LWRP/URP and HDRP. Feel free to upgrade the material to your render pipeline, or use your own material.
- The toggle Optimize Source Mesh applies a Automatic Decimation to the source mesh. It’s not recommended for detailed meshes, but it can help for basic shapes, such as a cube subdivided in more vertices than it should be.
- Setting 1 on LOD Levels will just apply a distance culling (and an automatic decimation if the toggle is enabled).
- You can apply changes to a prefab instance, as long as the decimated mesh were saved to the Assets (otherwise the meshes will be missing, as they are stored in the scene data).
- You can undo the whole AutoLOD process with Edit -> Undo
- You can put several objects in the drag and drop area. AutoLOD will just add the valid ones to the list.
- You can add a MeshRenderer or SkinnedMeshRenderer from its context menu in the inspector
Warnings
- Generation can take several minutes for a whole scene. Unity will freeze during the process but a progress bar will provide a visual estimation of what is happening. The progress bar is more precise for Unity 2020 and above than the previous releases.
- If the processed object has specific components attached to it, they will remain but make sure they still work properly. If they were using the attached MeshFilter or Renderer, they will probably be broken, but it should be easy to fix in most cases.
- Please check carefully which objects you put in AutoLOD and understand that there are just too many cases that can end up with bugs, especially with your MonoBehaviour scripts.
Contact
Feel free to contact me via one of the social media availbale on the bottom of
the AutoLOD editor window or via e-mail: chaumartinleo@gmail.com


